Skip to content

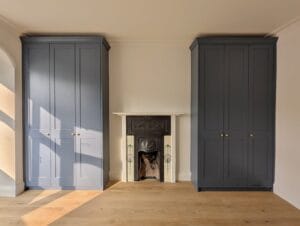
Begin with the wall. A fitted wardrobe reads as panelling when its door lines continue the rhythm of the panelling beside it: the same colour, rails at the same heights and panels in the same proportion. Settle those three things first and the handles, hinges and finishing follow from them. A three-panel shaker door painted in the wall colour already carries two cross rails and three recessed panels, which is the vocabulary of shaker panelling. What decides whether it convinces is alignment, plus a handful of details where a door has to behave differently from a fixed panel.
Set Out the Panel Grid Before the Doors
Applied wall panelling is a pattern of mouldings fixed to the plaster: a rail along the top, a rail at the bottom and upright stiles between them, making a row of rectangles. The proportions of those rectangles are what the wardrobe has to continue. A dado-height scheme puts its top rail at about a third of the wall height, around 800 to 900 mm under a 2.4 m ceiling and close to 1,000 mm under a 3 m one; taller schemes stop near two thirds, and full-height panelling runs up to the ceiling or cornice.
Take every rail height from one level line struck across the wall, since a floor that falls along the run would carry a tape measurement with it. The wardrobe maker works from the same line, so the door rail and the wall rail stay at the same height.
Panel width matters as much as height. A single panel narrower than the rest draws attention, so the wall length is split into a whole number of equal panels and the exact width worked back from that count. The wardrobe doors repeat that width, or a clean multiple of it, and the count is centred on the feature people look at first, a chimney breast or a doorway, so any leftover lands in a corner.
Wall panelling is a separate job from the wardrobe. Decide at the start who sets out the grid, and hand the other trade the measurements, because two grids drawn independently will not meet.
How a Shaker Door Reads as a Panel
A three-panel shaker door has two vertical stiles, a top rail, a middle rail and a bottom rail, with three recessed panels between them. Painted the colour of the wall, the door loses every colour contrast, so the eye reads only the shadow inside each recess. Shaker wall panelling forms the same shadows from applied flat mouldings. Light falling across the wall draws both sets of lines in the same way, and that is why the match holds at a glance.
Three details separate a convincing match from a near miss:
- Rail width: A door stile clearly wider than the wall mouldings reads as a door frame.
- Recess depth: A shallow recess casts a faint shadow beside a deep one on the wall, so the two look like different products.
- Plane: The wall mouldings stand only the thickness of a moulding proud of the plaster, while the doors sit forward of it by the full depth of the wardrobe. Painting every surface of the run in the wall colour, including end panels and plinth, keeps that difference in depth from showing as a change of colour.
A contrasting door colour does the opposite job: it announces the wardrobe, which suits a room where the cupboards are meant to be seen.
Steps to Plan the Disguise
None of these steps involves cutting, fixing or drilling.
- Record the grid: Note the top rail height, bottom rail height and each panel width on the wall that will hold the wardrobe, or draw the grid you intend to have built.
- Choose one colour: Doors, end panels, plinth and wall panelling take the same colour, so decide it before any of them is ordered.
- Place door joints on stiles: The gap between two doors is a vertical line. Where it falls on a wall stile it reads as a joint between panels; where it falls across the middle of a panel it reads as a split.
- Match the cross rails: Ask for the door top and middle rails to sit at the same heights as the wall rails, measured from the level line.
- Choose the opening method: A handle sits in the field of a panel where the wall has nothing. Push-shut catches leave the face plain and have their own needs.
- Settle the edges: Agree how the run finishes at the ceiling, at each end and at the floor, because those are the places a disguise gets found out.
Tip: Photograph the wall square-on with a tape or marked batten standing against it, then note each rail height against the tape. The photo carries the grid to the design visit, so nothing is guessed from memory.
Handles, Push-Shut Catches and Hinges
A knob or bar handle in the middle of a panel is a clear giveaway, and a push-shut catch removes it. The catch is fixed inside the carcass, behind the point where a handle would sit, and a press on the door face releases it and pushes the door a short way open. A magnetic catch is paired with hinges that have no built-in closing spring, because that spring would pull the door straight back as the catch lets go. Its travel also has to suit the door: on some systems the short unit pushes the door out about 17 mm, and doors taller than about 1,300 mm take a long-stroke unit that pushes about 38 mm. A floor-to-ceiling run takes the long version.
Each door also needs a small clearance behind it, around 2 mm, so it can be pressed in far enough to trip the catch. The visible gaps between doors are a separate setting, kept even along the run, which is why the joints in the plan fall on stiles.
Concealed hinges are cup hinges: a round cup is let into the back of the door, and the arm and mounting plate sit inside the wardrobe, so a closed door shows no hardware at all. A standard concealed hinge opens a door to roughly 110 degrees, and the room that the swing needs beside a wall is the first place the illusion can fail.
Where the Illusion Breaks
Door gaps: the wall has joints filled and painted over, and the wardrobe has real openings. The gap cannot be filled, so the plan reduces its visibility: even gaps, joints on stiles, and no horizontal gap across the middle of a panel.
Hinge edges and wall mouldings: wall mouldings stand proud of the plaster. A door that swings past a moulding at the end of the run can catch it, so the hinge side needs a margin, or a filler strip, beside the nearest moulding.
Skirting: the wall has a skirting board, and the wardrobe has a plinth. If the two differ in height, a step shows where the run ends. Ask for the plinth to match the skirting height, so the baseline carries straight through.
The ends of the run: the wardrobe front stands forward of the wall panelling by the cabinet depth, so the end of the run shows a side panel that the wall never had. That panel takes the same colour, and a panel grid returned along it, so the run reads as a projecting section of panelling.
Movement at the joints: the wardrobe and the wall panelling move by different amounts as the room’s humidity changes, so a hard-filled joint between them can crack. A flexible caulk line at that junction takes the movement, and a hairline there is a decorator’s touch-up.
Sockets and switches: a faceplate cut across by a stile or rail breaks the grid. Plan the grid so every faceplate lands whole within a single panel, moving a stile where needed, not cutting a moulding around a switch.
Warning: Any socket, switch or cable that has to shift is a job for an electrician. Have the change made and tested before the wardrobe is built, and keep every faceplate reachable, because a built-over accessory cannot be serviced.
When to Bring in a Professional
- A cabinet maker: A wall that leans or bows shows along the straight edge of a painted run, and scribing the wardrobe’s end panels and top to the wall and floor takes that difference up on site.
- An electrician: For any accessory in the footprint, and for lighting inside the run, which is separate from the wardrobe itself.
- A damp specialist: If one patch of wall stays discoloured, peels or feels cold and damp to the touch, the cause is found and cured before any wardrobe or panelling goes against it, because a closed run hides the wall and holds moisture behind it.
- A decorator: Caulk, filler and the finishing coats at the joints are a decorator’s skills.
Settling the Look
A disguised wardrobe succeeds on the plan, long before any paint is opened. Agree the grid, the colour and the joints on paper, and the doors become another run of panelling that happens to open.
Frequently Asked Questions
A three-panel shaker door borrows its look from flat frames, so it matches flat-framed panelling best. Beaded, raised-and-fielded or reeded panelling carries profiles the door cannot copy. With those, a plain slab door in the same colour sits quietly beside the wall, and the interest comes from the wall.
Yes, when the grid is shared. A panelled band behind a bed, about 1,200 mm high and carried 300 mm or more past each side, frames the bed itself. Where that band runs on into the wardrobe, a door cross rail at the same height carries the line across both; where it stops short of the run, the doors can stay plain.
On some catches the pin can be turned by hand to move the door, across a range of about 1 mm in to 4 mm out from the factory setting. Ask the fitter to make that adjustment. A door that still sits proud afterwards has a hinge to be re-set.
The wardrobe stops against the architrave and is scribed to its profile, so the door casing keeps its own outline and is never boxed over. Where the casing sits back from the wardrobe face, a narrow filler painted in the run colour closes the step.
It can help and hinder. A deep shade makes door gaps and moulding shadows look alike, which helps the disguise, but any thin patch of paint on an edge shows as a paler line, so deep colours are given extra coats on every edge of the run.
The same one. A single colour in two sheens catches window light differently, and the doors then read as a separate surface even where every rail lines up. Choose the sheen for the wall panelling first, since it covers the larger area, and have the doors finished to match.
Count the panels on the wall the wardrobe will join and bring that count to a free design visit — the designer can then set each door joint on a stile and each door rail on your panelling line. Humphries Cabinets serves London. Call 020 4538 7044.