Skip to content

Turning an alcove into a fitted wardrobe is one of the smartest ways to maximise bedroom storage without sacrificing valuable floor space. Whether it’s the space beside a chimney breast or a recessed wall in a period property, a bespoke alcove wardrobe transforms an awkward gap into practical, built-in storage.
At Humphries Cabinets, we’ve been designing and installing fitted wardrobes across London for over 15 years. If you’re considering a DIY alcove wardrobe project, this guide walks you through the essential planning, construction steps, and professional tips to help you achieve a clean, built-in finish.
Why Build a Wardrobe in an Alcove?
Alcoves are often underused areas that naturally lend themselves to fitted storage. Unlike freestanding wardrobes, a built-in solution:
- Blends seamlessly with your room’s architecture
- Maximises vertical space from floor to ceiling
- Eliminates wasted gaps
- Allows full customisation of the internal layout
- Adds long-term value to your home
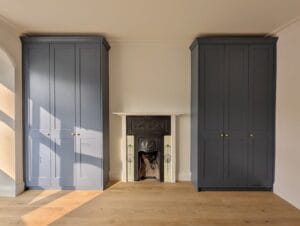
A well-built alcove wardrobe looks intentional and permanent, enhancing both functionality and aesthetics. In many London homes, particularly Victorian and Edwardian properties, alcoves sit either side of chimney breasts — making them ideal for symmetrical fitted wardrobes that frame a bed or fireplace beautifully.
Planning: What to Consider Before You Start
Proper planning is the foundation of any successful fitted wardrobe build.
Measure the Alcove Accurately
Measure the width, height, and depth at multiple points — top, middle, and bottom. Walls in older London homes are rarely perfectly square.
Also consider:
- Skirting boards
- Coving or cornice
- Uneven floors
- Obstructions such as sockets or pipes
If you plan to include hanging rails, ensure the depth is sufficient (typically 550–600mm for full hanging space). If the alcove is shallower, you may need to consider angled rails or shelving instead.
Plan the Internal Layout
Think about how you’ll use the wardrobe daily. Sketch a layout that suits your needs:
- Double hanging rails for shirts and trousers
- Full-length hanging for dresses or coats
- Adjustable shelves for flexibility
- Deep shelves for bedding
- Shoe storage
- Drawers for accessories
Designing around your lifestyle ensures the wardrobe works efficiently and prevents wasted interior space.
Choose Materials and Style
For a modern, paint-ready finish, MDF is a popular and cost-effective choice.
For added warmth and durability, you may prefer:
- Veneered MDF
- Birch plywood
- Solid timber details
Door styles can include:
- Shaker-style panels
- Flat contemporary doors
- Tongue-and-groove designs
- Handleless push-to-open systems
Choose a style that complements your bedroom décor and existing joinery.
Doors or Curtains?
If you’re on a tight budget or prefer a softer look, a curtain rail can be a simple solution.
For a true fitted appearance, hinged or sliding doors provide a cleaner and more polished finish. Sliding doors are especially useful in smaller bedrooms where clearance space is limited.
Consider Access for Assembly
If the room has narrow hallways or tight access, you may need to construct the wardrobe in place rather than assembling large panels beforehand. Always think ahead about how materials will be brought into the room.
Step-by-Step: How to Build a Wardrobe in an Alcove
Step 1: Measure and Mark Out
Mark the full dimensions of your wardrobe on the walls. Use a spirit level to ensure all lines are straight and plumb.
Step 2: Build the Base Plinth
Construct a base frame using 2×2” or 3×2” timber battens.
- Secure it to the floor (checking for pipes or cables first).
- Top it with MDF or plywood to create a stable platform.
The plinth raises the wardrobe slightly, protecting it from floor moisture and helping level uneven surfaces.
Step 3: Install Vertical Battens
Fix timber battens to the back and sides of the alcove. These act as supports for side panels and shelving.
Check alignment regularly using a level — accuracy here ensures your doors will hang properly later.
Step 4: Fit Side Panels
For a cleaner finish, cut side panels to size and scribe them to the wall if necessary to account for uneven plaster. Secure them to the battens.
Step 5: Install the Top Panel
Fix a top panel flush with the front of the alcove. This completes the main carcass structure.
If your wardrobe is wide, consider adding a central support for strength and long-term durability.
Step 6: Build the Internal Storage
Install shelves, rails, or drawer carcasses according to your design.
- Use strong shelf supports or pocket hole screws.
- Ensure hanging rails are positioned at practical heights.
- Double-check spacing before fixing permanently.
Taking your time at this stage ensures the wardrobe is not only attractive but also functional for years to come.
Step 7: Fit Doors or Curtain Rail
Cut MDF doors to size or install pre-made doors. Fit with concealed hinges for a modern finish.
Adjust the hinges carefully so the door gaps are even and consistent.
If opting for curtains, fix a rail securely to the inside top panel.
Step 8: Add Trims and Finishing Details
Use architrave or decorative moulding to cover gaps between the wardrobe and surrounding walls.
Fill screw holes, apply caulk along joints, and sand all surfaces smooth before painting.
Step 9: Prime, Paint and Finish
Seal MDF with primer before painting. Apply two coats of durable paint such as satinwood or eggshell for a long-lasting finish.
Finally, attach handles, knobs, or push-to-open fittings and inspect everything for alignment.
Professional Tips from Experience
Over-Bed Storage Units
Use a spirit level constantly. Even slight slopes can cause issues with door alignment.
Allow small expansion gaps. Timber expands and contracts slightly over time.
Plan for ventilation. Prevent moisture build-up inside wardrobes.
Wardrobes Either Side of the Bed
Maintain access to services. If covering sockets or valves, include removable panels.
Take your time with preparation and painting. A smooth finish is what makes a DIY build look professional.
When to Call in Professionals
While building a fitted wardrobe in an alcove is achievable for confident DIYers, it requires precision and patience. Achieving a seamless, built-in look — especially in period properties with uneven walls — can be challenging without specialist tools and experience.
At Humphries Cabinets, we design and install bespoke alcove wardrobes across London, ensuring a flawless fit and high-quality finish. From initial consultation and 3D design concepts to final installation, we handle every detail to create wardrobes that feel truly integrated into your home.
Final Thoughts
Building a fitted wardrobe in an alcove is one of the most rewarding ways to upgrade your bedroom. It enhances storage, improves layout efficiency, and adds character and value to your property.
With careful planning, quality materials, and attention to detail, you can create a practical and stylish storage solution that looks custom-built rather than added on.
If you’d prefer expert craftsmanship and a guaranteed finish, Humphries Cabinets is here to help. Get in touch today to discuss your alcove wardrobe project and explore how we can transform your space into something beautifully functional.